The yarn has been measured, threaded through the reed, sent through the heddles and is ready to be wound on!
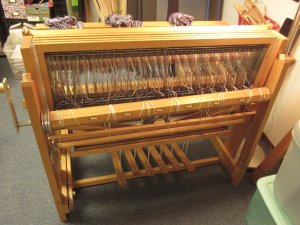
The photo above shows the back of the loom. There’s a bit of loom-altering that happens after the heddles are threaded and before I start winding. The entire back beam structure opens up and the top bar slides on (which you can see in the image below). It’s funny how owning a loom requires you to be part mechanic, along with the rest of the hats you wear (artist, mathematician, scientist, etc.)!
When I first learned to weave, I remember my instructor saying I just needed a square knot at the back, nothing fancy. But, when tying on the front, there was a trickier knot to learn. And because I had never done a craft using any variety of knots up to that point, I had to clarify what a square knot was! You could say I was a true Beginning “Knotter”! (It was a big learning curve, to say the least!) A huge part of the first year of lessons was me asking, “how does that knot go, again?”
So one of the objectives of winding on, is to straighten out the yarns before they go through the lease sticks and the reed. This allows them to move through the loom without snagging on anything, which could lead to a number of things – the worst being yarn breakage. I don’t love this part of the process. But my good friend, Madelyn van der Hoogt, (and I say “good friend” because I own her video & we’ve bonded through the TV) talks about approaching this part of the process with a Zen-like quality. “We should enjoy this time, appreciating the yarns and all the steps of dressing the loom”… Let’s just say I get cranky and frustrated LESS often now that Madelyn and I have talked… I’m not 100% yet…
If you haven’t read a previous blog where I’ve been winding on, let me introduce you to my beloved yard sticks! My loom has a 36″ wide weaving width. Thus, yard sticks are a perfect fit around the front and back beams! They keep the yarn from developing mountains and valley when winding over itself. Once upon a time, I picked up different lengths of scrap from Lowe’s – which could have been a great idea! But then, I soon realized that they are scraps because they are irregular in length and width, which I didn’t really enjoy. To add to that, I didn’t really want to take the time to sand all of them. So… yay for yardsticks!!!
I intentionally made this a shorter project because I’m getting smarter in my old age. When I first started making fabric for bags, I thought I should put on as much yarn as I could handle in an effort to dress the loom less often. Which, in theory, is a great idea! What I’ve learned is that I get bored somewhere around 70% finished and it’s tough to get re-inspired at that point. So it’s better for me to have shorter projects and then I get to celebrate being finished more often! Woohoo!
These are the fancy knots I mentioned earlier. The beauty of them is that when you are ready to undo them, you tug on the shorter ends and voila! Knot is no more! Because I use the kind of cotton yarn I do, I’ve found that the fancy knot will slip open if I don’t put another basic knot underneath it – which negates the magic a little bit. But all in all, it’s still easier to undo at the end of the project than a square knot!
And just like that, kids, we are ready to weave! I’m slicing up neckties as we speak! Should be fun! Talk to you soon…


