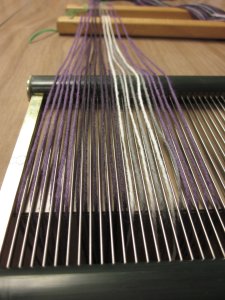
Next up, let’s sley the reed! A reed is a rectangular metal frame with slots evenly spaced from one end to the other. The purpose is to keep the yarns spaced the way you want! The reed I’m using today is an 8-dent reed, meaning there are 8 slots per inch.
To sley the reed, I need a few item – reed (naturally!), lease sticks and a pair of scissors. I have a 36″ wide reed to fit into my 36″ wide loom – go figure! Next up, I’m bringing over the yarn that I measured on the warping board.
I measured the project in 3 chunks – thus, the 3 groupings you see in the photo. The trick becomes making sure they are in the right order. Each chunk is different and I have a specific plan for how they’ll go into the loom.
Lease sticks are just about the most simple and brilliant thing ever invented! They are 2 sticks with holes in each end. The idea is that you slide the sticks through the yarns and tie them together, keeping the yarns in the order you created at the warping board. Sounds like no big whoop, right? All you have to do is forget the lease sticks once and the chaos that ensues will be enough to guarantee you don’t forget again! You’ll have yarns everywhere, willy-nilly, creating complete anarchy! Makes me want to cry just thinking about it… Moral of the story, lease sticks – good! Anarchy – bad…
Before I removed the yarns from the warping board, I knotted choke ties at the cross so I knew where the lease sticks had to go. Bottom line, those green yarns are the choke ties that along with the lease sticks, will help keep my sanity!
When sleying the reed (I’m not really sure why it’s called “sleying”! But, it’s fun to say just the same!), you have lots of choices. I’m using an 8-dent reed. I could have used a reed with more or less dents/slots per inch. If I wanted the yarns spaced closer, I could have more than one yarn in each dent. (I always feel like my brain is oozing out of my ears when I try to figure out squeezing 20 yarns per inch into a reed with 12 dents per inch… Makes your head hurt, right?)
I like to double check the math and knot the yarns every inch. Keeps me honest!
Next up, moving the reed/yarn/lease sticks over to the loom. This weird balancing act is always humorous, considering I’m transporting a loose stack of yarn on a narrow, metal piece with holes in it! Thank goodness the trek is about 10 feet! Once I get to the loom, I have to turn the reed upright and place it in the beater bar – without catching any yarns underneath it! After all these years, I still haven’t figured out a more elegant way to do it!
When I place the reed into the beater bar, the knots face the back with the draping yarn hanging over the front of the loom. This makes life much simpler when I thread the heddles in the next step!
I like to keep the lease sticks in place to encourage the yarns to behave while I wind everything into the loom. But, I don’t want them flopping all over the place. So, I make a sort of bridge between the front of the loom and beater bar, threading though the lease sticks as I go. May not be pretty, but it works!
So now, boys and girls, you have your trivia for the day! When someone asks, “What does ‘sleying the reed’ mean?”, you can happily reply, “I have no idea! But, this chick who writes a weaving blog LOVES to do it!” And impress all your friends! Next up, we’ll add another weaving word to your vocabulary – HEDDLES! Yay! Talk to you soon…


