Time to sley the reed!
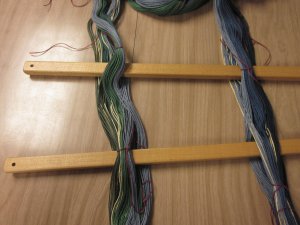
First off, I slid my lease sticks into the yarn where I marked the cross – thus, keeping the yarns in order. (By the way, it’s critical to tie the 2 ends of the lease sticks together once they are in. If you forget, the slippery little things will slide right out at some point! So, I’ll be tying those right now!)
Because of the way the cross was created on the warping board, you can sort of “read” the order the yarns fall in – as long as you know what you are looking for. Takes a little practice, I’ll admit. But, once you figure it out, it’s brilliant! And it seems obvious, which is good news when trying to avoid mistakes! (Ha! Read vs. reed – pun intended, it seems!)
For this project, I’m using an 8 dent reed. A reed is a rectangular frame with evenly spaced slots. The idea is that the reed will keep the yarns at a consistent spacing for the project. Very important!
An “8 dent” reed means there are 8 slots per inch. You can see the number etched into the metal at the end of the reed. That’s how you know what you are working with! You could always get out your ruler and count the slots – that would work, too!
Because I’m filling the entire reed, I like to start at one end and work my way to the other. If I have a narrower project, I’ll start in the middle!
An 8 dent reed is pretty easy to work with! I can usually slip the yarn through with no problem. But, if I was using a fatter yarn or a smaller dent reed, it would be helpful to use a sley hook! It’s a nifty little tool that helps thread the yarn through the reed. (Yep, I used the word, “nifty”… kind of nostalgic, right?)
As you take a peek at the image above, you can see which yarn is in front of the other. That’s what I’m referring to when I say you can “read” the order! (The grey/blue yarn closest to us would be first, then the cream-colored, then the next grey/blue, etc… Now, you too can be an expert in sleying the reed!)
The reed is all set to go into the loom! This is always a great step – joining all the pieces together! I’ll be tackling some heddles when we chat next! Talk to you soon…


