Laura – I love it! She had all sorts of “gold” titles for me! Thank you much! I’ll be taking ideas for next week! So, send them my way! Let’s finish threading the heddles, shall we?
I’m taking each yarn and threading it through the eye of a heddle on one of the shafts. My loom only has (4) shafts, so not too many choices! The pattern is really straightforward, making my job a little bit easier!
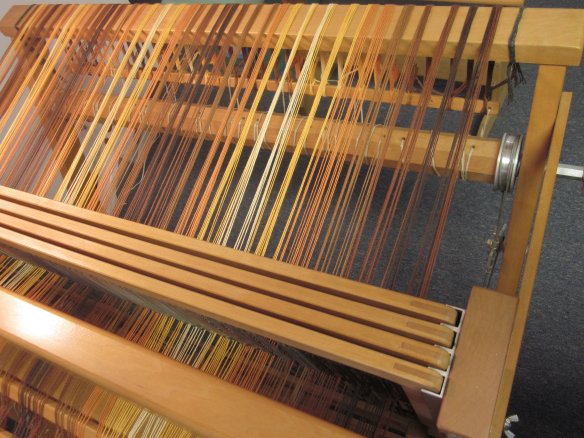
I like to include a few images from various angles to present a different perspective. Especially in this case! Because, you can see the yarn travel from the front, through the beater bar which holds the reed, and lastly through the (4) shafts that hold the heddles – all the really critical elements in the loom! If the yarns aren’t in the proper spot, the weaving process can quickly become less than fun. And no one wants that!
Now that all the yarns have been matched up with a heddle, it’s time to tie everyone to the back of the loom and wind them on! First up, extending the back of the loom! I had everything condensed so I could sit very close to the heddles. Now, I have to let the loom stretch back out to it’s full size!
Next, I’ll tie the yarns to a rod that has been lashed to the back. You want to unroll the rod and take it over the “rear oval beam”, which is the beam at the top, versus the beam that the project winds onto. So, confession time… I tend to call both the “warp beam” and “rear oval beam” the same thing – the back beam! In rare instances when I need to differentiate, I just rephrase the sentence to work around it! Ha! Now you know my dark little secret! Don’t judge. And definitely don’t tell anyone who thinks I know what I’m talking about! It can just stay between you and me, right?
When you wind the yarns, you need to release the brake first so all the loom parts will move. I always look like I’m playing a strange game of twister when I do it! Because you release the brake with your left foot, turn the crank with your right hand and I usually use my left hand to keep the lease sticks level with the eye of the heddles so everything moves as smoothly as possible. Let’s just say I recommend doing a few tree poses beforehand to help with your balance!
(In the picture below, you can see both the rear oval beam and the warp beam. The warp beam is easy to pick out because the white cords are already winding around it. The rest of the yarns will soon wind around it, too! Whereas, the rear oval beam is just a place holder that the yarn travels over. It’s at the top right of the image. See how I’m practicing my new vocabulary already?!!)
And let the winding continue! Between you and me, this is not my favorite part of the process. Mostly, because it means I am SO close to weaving! So close! But, it’s essential and with any luck, I will be happily throwing the shuttle in no time! Stick around to see the fun! Talk to you soon…


